Best Tips and Tool to Create Screen Recording Videos for Bloggers
As a blogger, you already know how to write content.
It takes days of persistent efforts and hours of grinding for producing quality content. On top of this, to ensure that your blog gets abundant traffic, the writing has to be well-researched, easy-to-read and SEO friendly.
However, when you look beyond these aspects, there is another variable that is very crucial for determining the success of your blog, and that is “Engagement.” Engagement means how well the readers are engaging and interacting with your blog.
A higher engagement rate will ensure that your readers scroll till the end, and don’t get wrapped up in endless paragraphs of written content. This is the exact reason why using an image or a GIF in a blog is an excellent idea for lightening the experience of reading the blog.
In this blog, we will explore another idea of improving engagement, and upping the visual appeal of your content; let’s talk about videos.
Many marketers have come to realize that videos are a great way of spicing the content to capitalize on the terribly short span of attention of the online reader.
Videos are more visually interactive, conversant and personal, therefore adding them to your blogs will bring great benefits.
When we talk about videos, the immediate picture that you visualize is that of a camera, isn’t it?
It’s obvious to think of a camera, lights, video editing software and everything else that completes the set-up of a video production unit because that’s how we know a video is produced.
Today, let's imagine video-making in a less complicated way; the one that demands less set-up, easy to record, and equally effective. Also, the only equipment that you need to have is the most prized possession of a blogger, a Laptop. We’re referring to screen recording videos here, one of the best ways of making videos for bloggers.

Why Use Screen Recording?
Right now, you must be having this question in your mind, and we don’t blame you for that. Adding screen recording videos to your content is not a very popular idea, but hear us out. Screen recording is easy and less expensive than the traditional way of making videos. Moreover, you can share the content that you already have on your laptop screen along with recording your face and voice with it.
Having said that, there is always an apprehension of starting with something new, so in the next section, we will cover some of the basic tips that you need to remember when you start recording your first screen recording video.
You can use it to create a very personalized “welcome note” for your blog or record your screen to share an example of complex statistics which otherwise is a very difficult job to attain by just writing about it.
4 Tips to Remember When Making a Screen Recording Video
Remember, these are basic tips to help you get started. As you become more comfortable with screen recording, you will gain more confidence, and the quality of your video content will improve gradually too.
1. Talk Naturally
If you’re planning to include your voice in your screen recording video, then this rule goes without saying. You don’t have to change the tone of your voice or sound very formal, talk naturally, and you’re good.
2. Shoot in a Silent Environment
The last thing that you want your audience to hear is the noise of a baby wailing or dinner plates clanking in your kitchen basin. It’s disturbing and brings down the quality of your content.
To avoid this, make sure that there is nothing around you that can subdue your voice or add an unwelcomed noise to your video; it should be just your voice. To achieve this, have a dedicated space for recording, add a DND sign right outside your door, and check your earphone quality too; if you plan on using them for recording.
3. Position Yourself Well
While using the webcam, you need to be mindful of the positioning of your face. If you’re recording your face with a webcam while you’re sharing the screen, then your face will be visible in a very smaller space relatively.
In that case, you have to ensure that your audience can see you clearly. Position yourself in front of your webcam such that your body is visible to your shoulders; if you go too far from the webcam, then your face will get faded.
Moreover, try practising talking while looking at your webcam instead of the laptop screen. It’s advisable that you do a couple of test run before you actually start recording to master this nitty-gritty.
4. Check your Video Background
Alright, these were the basic starter tips that can help you to make your first screen recording video without any hiccups. Once you master these, it will hardly take you any time to qualify to the pro level.
Learning the basics of screen recording is great, but if you don’t know about the best tools that will help you to get this done, then it’s just half-baked knowledge. So, it’s time we dive into the next part of the blog, and check out the best tool available for screen recording - Vmaker.
What makes Vmaker the Best Tool for bloggers to create screen Recording Videos?
Vmaker is a free screen recording tool that allows you to record unlimited screen recording videos. As a user, you’re not barred from using its basic features, and there is no limitation on the recording duration too (unlike many other tools available in the market). You’re free to upgrade if you have a big team, and want access to the more advanced features.
Apart from being user-friendly, Vmaker is easily accessible for different OS. If you use Mac, you can download the Mac version of the tool, and if you’re on Windows, you can use the Chrome extension. Once you’ve recorded the video it gets saved in the cloud which you can access and download anytime. Further, you can download the video, share it, and embed the link in emails too.
4 Best Features of Vmaker for Bloggers?
To get a more precise view on how Vmaker will be helpful to the bloggers for making screen recording videos, let’s dive to understand the specific features -
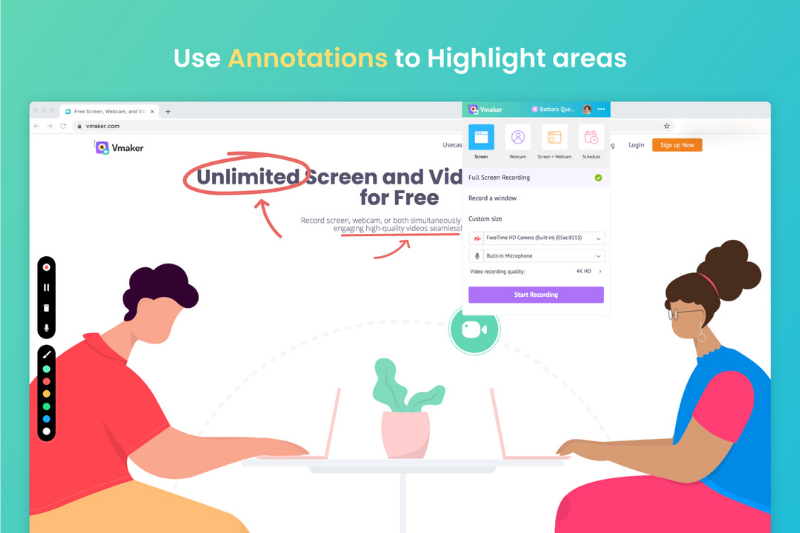
1. Use Annotation and Mouse Emphasis
If you write blogs on technical subjects and share images of diagrams, structural drawings and formulas, then this is an awesome feature for you.

With annotation, you can draw lines, circles, arrows to highlight information. Besides, mouse emphasis will help you to keep your audience’s attention centred as it helps them to track where you’re clicking, and moving your pointer.
2. Block Notifications
Bloggers need many apps to get their work done, and that is understandable. However, app notifications can be distractive especially when you’re recording.

To put them on mute, Vmaker gives you the DND feature which will help you to cut out these noises. Therefore, while recording you don’t have to worry about distractions, and concentrate only on creating quality content.
3. Employ Analytics
This is probably the best feature that will help a blogger to find out the views on their videos. When you use a screen recording video made with the help of Vmaker, in your blogs, it automatically calculates the number of views that you get on these videos.

This way, you know if your readers are actually viewing the videos or not.
4. Start Editing
Sometimes your videos may not turn out the best; like the video got too lengthy than you expected. In that case, you can use the in-built video editor of Vmaker to trim the video before adding it to your blog.

Also, you can crop and resize the video to add to the visual aspect. This means you don’t have to spend an extra buck on buying editing software separately.
These are only four points, but to learn more about Vmaker, we recommend checking out their features page.
Final words
Adding videos to blogs is a great idea; it makes the content more appealing and has the potential of improving engagement. However, making videos is challenging and costly which can demotivate a blogger from trying the idea. To help bloggers, and to make their life easy, screen recording videos can be a great idea.
Screen recording videos are easy to create, less expensive, and relatively takes less time. Additionally, it hardly takes any time to learn the basics of screen recording and getting started with it. For a blogger, this can be a great way of adding videos to a blog without worrying too much about it.
While learning the basics is good, knowing about the tools also make the life of a blogger easier. This brings us to Vmaker, a free screen and video recording tool that allows users to make unlimited video recordings. Unlike other tools, Vmaker has no restrictions for free users on recording limit and access to features. This is a piece of great news for bloggers, and shouldn’t stop them from giving it a shot.
To summarize, screen recording videos are simple to create and effective. Once you start with it you will get better at it, and start seeing the results. The important thing is to get started.


Post a Comment