How to add Google progress scrollbar on top of your BlogSpot page?
Sometimes the scrollbar doesn't represent correctly the length of the post. So in those cases the best way is add this new 'scrollbar' that represent your position only for post height. So the visitor can see how much it left without losing his scroll/read position.
You may have seen a progress bar in various Google product site’s pages that when scroll through the page then a horizontal progress color bar is rolling from left to right side on top of the page. This progress line is indicating your position only from the total page height.
However this feature is not very important for blogger platform users but if you would like to extend the prettiness of your blogger theme then adding this feature in your blogger theme would be a perfect choice. I have developed this custom feature to make it compatible with blogger platform. When visitors will visit your blog pages then this Custom module Progress Scrollbar will display the length of your blog pages through a horizontal color bar.
Generally, this features works by measuring page height. Suppose, you scrolled 25% of the blog page then a horizontal colored line or progress bar would be filled by 25% on top of the page. This is pretty interesting and useful for beautifying the webpage. If you scroll more proportion of the page, then horizontal colored line and length of the line will extend along it where the page is rolled.


So using this feature in Blogger page would be amazing. This features simultaneously works on Blogger home page and post pages. Moreover, it is compatible with almost all major browsers. Once you apply this feature in your blogger theme then it will work on both Desktop, Tablet and Smartphone.
Let’s proceed to the Google progress bar installation process
Step #1: Login to your Blogger BlogSpot
account and if you are running multiple blog then select the appropriate Blog to
install the Google progress bar feature.
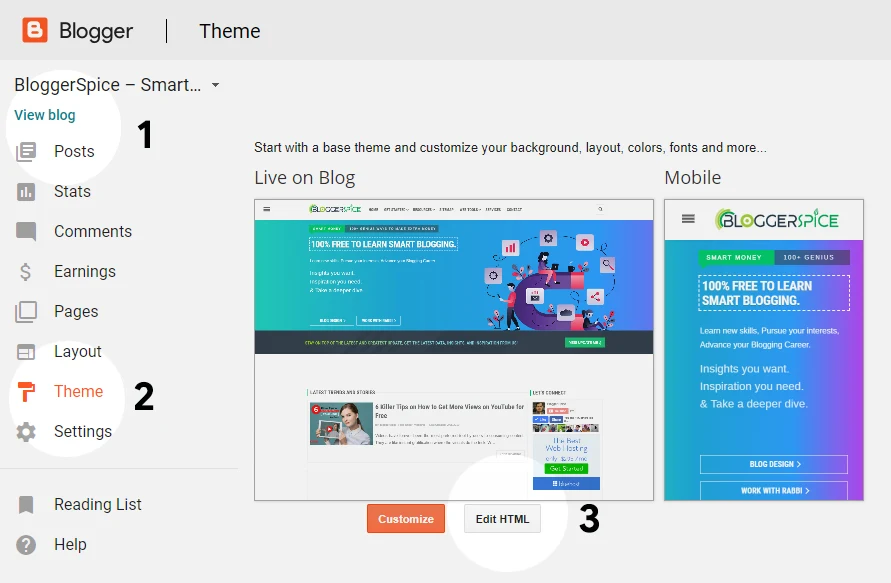
Step #2: Now go to the Blogger dashboard
Step #3: Select

Theme
tab and Click Edit HTM button
Step #4: Find the closing
]]></b:skin> by pressing Ctrl+F (Windows) or CMD+F (Mac) and copy the below CSS script and paste it above closing ]]></b:skin>
For Solid color scrollbar please use this CSS code block
Customization
- To change the scrollbar colors please alter the #1dbf73 code from above script. Please use our color picker and Flat UI color page to get the color code.

For Gradient color scrollbar please use this CSS code block
Step #5: Again search
<body>
and above this opening body add the below HTML script.
Customization
- To change the scrollbar colors please alter these #ea3a7e, #20aadb, #23e0b3 colors. You can use our color picker and Flat UI color page to get the color code.
Step #6: Again search
</body> and above this closing body add the below JavaScript.
Step #7: Finally hit the
Save
theme
button to save your progress.
Now visit your blogger page and scroll to see the beautiful horizontal progress bar. I hope you will love this new feature in your blogger theme.

12 comments
You can Check to Confirm.It Works
https://media1.giphy.com/media/l3vR4yk0X20KimqJ2/giphy-downsized-medium.gif
Thank you very much!
I have to test it on default blogger theme. But this script doesn't have any conflict with blog image script.
Now I fix it by another way, like this:
Different blogger using different theme. So same widget maybe not compatible for all blogger theme. For this reason sometimes we have to customize the script.
I shared a base script and user can customized it in different ways.