How To Use Custom Google Fonts in Blogger or WordPress Blog?
How to Upload + Use a Custom Font on Blogger? Adding custom fonts to your blog is easier than ever with drop-in scripts like Google Fonts and Typekit.
The concept of using custom fonts on your website has progressed significantly over time.
When I first started making websites, the only fonts available were Arial, Georgia, Verdana, and Times New Roman.
It had to be a font that was installed by default on all computers. If you use a font that you installed on your own device in your CSS and HTML, only visitors who have that font set up will be able to see it perfectly.
You can guess how this resulted in some clumsy-looking websites! Unfortunately, some people continue to attempt to incorporate fonts in this manner, but obliviously it was the biggest weakness.
Afterwards, utilizing Javascript codes, you could use any font you chose, regardless of where it was pre-installed on your visitor's machine or not. This solution was hard to execute and took much more effort than it was worthwhile.
Now we have Web Fonts, which make it extremely simple to use non-standard fonts across your website.
This article will explain what Google Web Fonts are and how to use them if you're unfamiliar with them. However, besides custom font, you should know about the web-safe font which helps the user to overcome various font issues.

What is Web Safe Fonts?
The “web-safe fonts” are the only fonts that are accessible to practically every user. Those were fonts that are installed by default on almost every operating system, keeping them safe to use for the vast majority of your prospective users
Web-safe fonts are included in most operating systems; as a result of their widespread availability, creative designers should expect typography using web safe fonts to look exactly as expected to the majority of users.
The following are pseudo lists of some fonts that are currently considered web-safe, sorted by CSS generic font families.
Serif fonts that are suitable for use on the web:
- Georgia Font
- Times New Roman Font
Sans-serif fonts that are suitable for use on the web:
- Arial Font
- Tahoma Font
- MS Trebuchet Font
- Verdana Font
Monospaced fonts that are web-safe:
- Courier New Font
Those are the common fonts but you may not always like those common old style font. For improving the content readability and users experience you should use custom fonts.
Custom Fonts and Their Importance?
You may wonder why you should alter fonts, indent within words, line and letter spacing, or text saturation. Regardless, some experiments show that typeface enhances reading literacy
The design of fonts has a huge influence. All determines the contents of a web page through design, both consciously and subconsciously.
And if readers aren't conscious of it, font architecture has an effect on them. Abandoning the font concept entails abandoning the transformation process as a whole! It has an influence on the reader's mood. The font either facilitates reading or causes users to quit the page.
A range of default fonts is used in all web browsers. This ensures that if the font isn't defined in the CSS of the webpage, it will revert to the regular edition.
You can still use the default fonts, but they make users' jobs more complicated. That is why using a custom font is important. Many websites and applications will assist you if your theme does not allow you to modify the font. To overcome this issue the solution is the Google fonts directory.
Why To Use Custom Google Font?
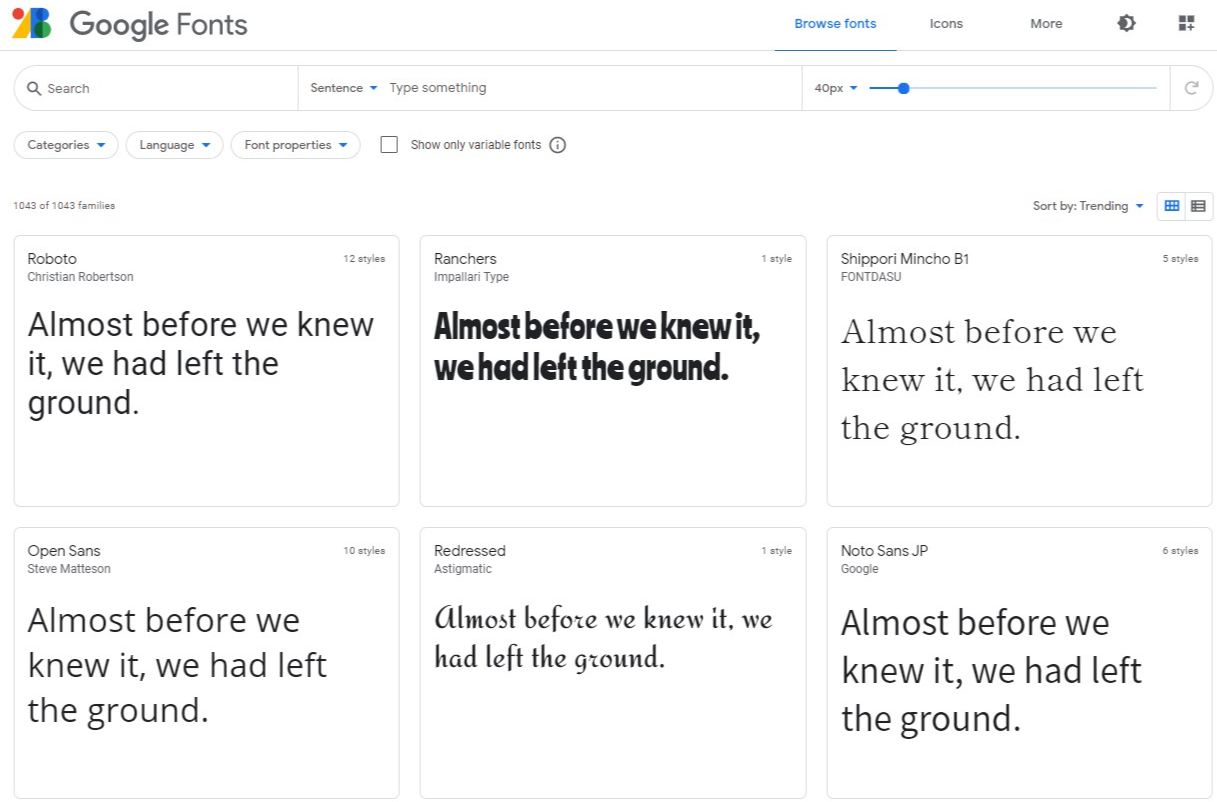
The 'Google Fonts' is a directory of free web fonts that web and creative designers can use. It was introduced by Google in 2010. Many of these fonts are very unique and attractive, while others are based on non-web fonts. During our last inspection, Google Fonts has 1043 font families in its database.

Blogger user like different blogger template according to the template design, layout and latest features. But Font is an important part of making a variation of the blogger template. Because different style and size font change the blog's looks and experience.
For example, in 2 column blogger template with 1200px width, we can use a large font. But it 3 column template we should use a comparatively small size font. Because using a large font in a small space won't suit the blog design. In addition, the eye-friendly font should select for readers thus they can easily read the content.
However, the problem will arise
when viewers have not the same font that your blog containing font because it
may not visible if the font is not installed on the viewer's system. So the solution is
to embed the font file in the blogger template.
Suppose your template containing "Oswald"
font file and which sets default as your template's font family. In this case, if readers didn't install the "Oswald" font then no problem template
will display the "Oswald" font properly.
For those who want to add or
change the older font with a custom Google font then this is the perfect guidelines
for them. Here we will learn how easily we can change our Blogger template's
font to give it different looks.
Using Google font is the best
method to change the Blogger template's looks. For using any kinds of Google Font
we have to use a default code like below-
Main Google font link http://fonts.googleapis.com/css?family=Oswald.
Here the font family is "Oswald". We have set this as our template
default Font. but the below code is the condition for using any Google Font.
First, we have to remove any
previous custom Google font used as Font family. Secondly, we have to select the font from the Font directory. And finally, we will add the font in the Blogger template.
How to Remove the custom Google font file used previously?
For removing custom Google The font we have to find out the older font file. So just follow the below steps-
Step 1 Log in to your Blogger
Account and Go to
your Blogger
Dashboard
Step 2 Now click on -> Template -> Edit HTML
Step 3 Now Find this code http://fonts.googleapis.com
by Pressing Ctrl+F
Step 4 After finding this kind of code you would see the full code
like below-
so delete the full code.
Note that if you don't find
any code like above then you have to understand that your template is not
containing any Google's custom Font file. So in this case skip this step. And directly
proceed to the next step.
How to get Google Fonts from Font Directory?
This is a very easy task to get fonts from the Google fonts directory. Currently, the Google Font directory
included 1043 Fonts. To get any suitable font please follow the below steps:
Step 1: Visit Google Fonts directory

You can see the font by different tabs like Word, Sentence, Paragraph and Poster style. This will help to understand how the custom font will look like.
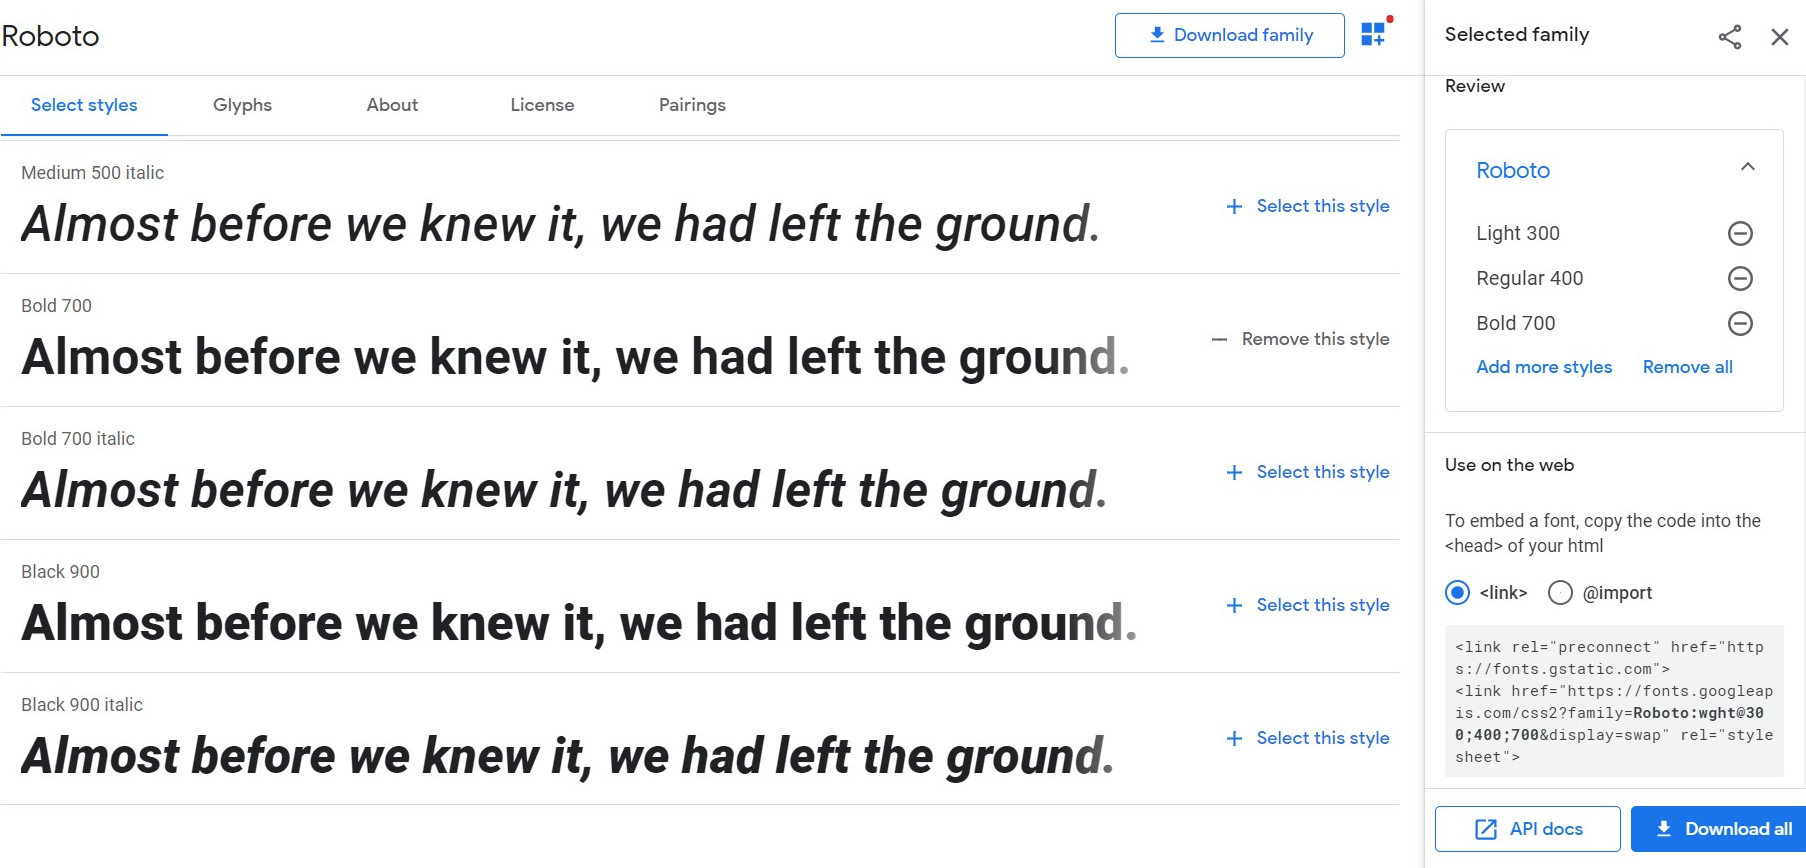
Step 2: Suppose we will use Roboto font in our Blogger theme. So click the Roboto font box and instantly you will be headed to a Roboto font page.
Step 3: Now select the different styles you would like to use in your theme by using '+ Select this style'. I have selected Roboto Light 300, Regular 400 and Bold 700 style.

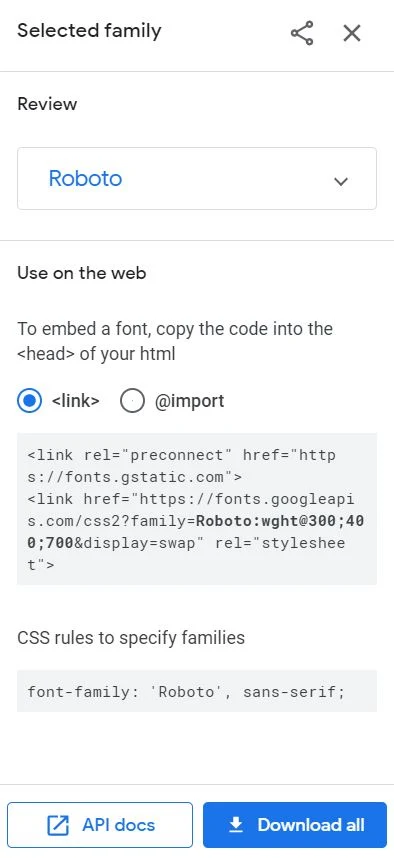
Step 4: There are two options that you can use to get the embed code,
First with the <link> tag and
the second with CSS @import

To get the code select anyone <link>or @import
<link rel="preconnect" href="https://fonts.gstatic.com">
<link href="https://fonts.googleapis.com/css2?family=Roboto:wght@300;400;700&display=swap" rel="stylesheet">
The @import code we get is as below:
The @import code we get is as below:
@import url('https://fonts.googleapis.com/css2?family=Roboto:wght@300;400;700&display=swap');
After copying the font go
through the next steps for adding our selected Custom "Roboto" Google font.
So we got the font code. And the next step would be implementing this font in your theme.
Step 1 Log in to your Blogger Account and Go to your Blogger Dashboard
Step 2 In the left menu click 'Theme' and from the top right use the 'down arrow' and click 'Edit HTML'
Step 3 Now Find this code <head> by Pressing Ctrl+F
body {
font-family: 'Roboto', sans-serif;
.............
.............
.............
}
h1 { font-family: 'Roboto',
Arial, serif; font-weight: 400; }
Here are several specific examples for Blogger theme that you can insert into the Theme Editor's CSS section:
How to Add Custom Fonts to Your Blogger Theme?
Finally, it's time to integrate
the custom Google font into our Blogger template. So for integrating the font
just follow the below steps-
Step 2 In the left menu click 'Theme' and from the top right use the 'down arrow' and click 'Edit HTML'
Step 3 Now Find this code <head> by Pressing Ctrl+F
Note that we can add the font file anywhere between <head> ............ </head>
Step 4 After finding <head> paste the code as the first element that you have copied from Google Font Directory. After adding the code you have to declare the "Roboto" font as your font family thus The Google Fonts API will generate the necessary browser-specific CSS to use this font.
Step 5 Font (font-family:
'Roboto', sans-serif;) can be used as part by part in blogger template like
below
- In outer-wrapper-
#outer-wrapper { font-family:
'Roboto', Arial, serif; font-weight: 400; }
- In the theme body-
- In first Header-
If you want to use the same font in all part of the template then you can declare like below-
#outer-wrapper, #main-wrapper, #sidebar-wrapper, #content-wrapper, body, h1,h2,h3,h4,h5,h6 ,.post, .post-body,#footer-wrapper { font-family: 'Roboto', sans-serif;}
But remember that different
designer defines the blogging section differently. For example instead of #outer-wrapper
maybe used #box-wrapper. Similarly instead of #footer-wrapper can be used
#bottom-wrapper. So you have to find out the code and declare the section. If
you become confused then simply individually declare in a different part.
Note to overwrite your own created font-family code for the font-family.
- Change your blog header font
.Header h1 {font-family: 'Roboto', sans-serif;}
- Change your post title font
h3.post-title, h3.entry-title {font-family: 'Roboto', sans-serif;}
- Change your post body font
.post-body {font-family: 'Roboto', sans-serif ;}
- Change your date font
.date-header span {font-family: 'Roboto', sans-serif ;}
- Change your sidebar title font
.sidebar h2 {font-family: 'Roboto', sans-serif ;}
- Change your post footer font
.post-footer {font-family: 'Roboto', sans-serif ;}
- Change your previous/next page link font
.blog-pager a {font-family: 'Roboto', sans-serif ;}
Save your blogger theme after adding the necessary code change and your new custom font will be visible.
How to Add Custom Fonts to Your WordPress Theme?
In your WordPress sites find the HTML template file on your theme. It's a smart idea to make a child theme for your main theme. So if you do make any changes then you can undo them later.
In certain instances, the main theme can not be edited. There are various WordPress themes, but basically, you need to find the header.php for editing. After that, find the <head> section and add the font code below the opening head code.
For example, in your WordPress, you would like to 'Poppins' font. Then you can generate it from the Google Fonts directory and add the code like below:
<link rel="preconnect" href="https://fonts.gstatic.com">
<link href="https://fonts.googleapis.com/css2?family=Poppins:wght@400;600;700&display=swap" rel="stylesheet">
Finally, save your WordPress theme to integrate the theme.
You can add one or more fonts to your site using the @font-face directive. However, there are advantages and disadvantages to this approach.
Advantages:
- You can link fonts in any format using CSS: ttf, otf, woff, and svg.
- You will not be relying on third-party resources because font files will be saved on your web server.
Disadvantage:
- You must register a separate code for each style's proper font connection.
- You will quickly get puzzled if you don't understand CSS.
Step 1: Create a folder named "fonts." under your child theme's wp-content/themes/your-child-theme/fonts .
Step 2: Upload the font files to your website that you downloaded from the Google Fonts directory. This can be accessed either via your hosting control panel or through FTP.
Both font files should be placed in the newly created fonts folder: wp-content/themes/your-child-theme/fonts.
Step 3: Using the child theme's stylesheet, import fonts. Open the style.css file for your child theme and apply the following code to the top of the CSS file. The best place is after the child theme commenting section.
This the normal style Poppins font that we set the font-weight and font-style properties to normal.
Wrapping up
It's now just a matter of saving your modifications and integrating your fonts into your templates. You can still update your fonts or apply new fonts to your code at a later time.
Note that removing a font family would cause any code that uses that font family to crash and collapse. So just back to a default web-safe font to add the new font. Before you delete a font from your code, make sure you're not using it anymore.
I have tried to define the
whole tutorial with simple and easy steps. If you have any confusion regards
this fell free to leave a comment below. Thank you.


2 comments
^_^